| « Windows Phone Outpaces Blackberry- But Should It | JetDirect Configuration in HP LaserJet Printers » |
Easier way to replace the swing plate assembly (RM1-0043)
02/19/07

Easier way to replace the swing plate assembly (RM1-0043)
HP LaserJet 4200/4250/4300/4350:
An Easier Way to Replace the Swing Plate Assembly (RM1-0043)
The swing plate assembly, a small obscure assembly in the right rear of the HP LaserJet 4200/4300 series of printers, has recently become very popular. Why? One reason is that, obscure as it is, it has a very important job: to couple the printer's main drive assembly to the fuser. The other reason is that if the fuser isn't fully seated (which is unfortunately a common problem in this series of printers), it will "bounce" when the swing plate attempts to drive it. This can damage both the gear in the fuser and the gear in the swing plate. The standard remedy for this condition is to replace both assemblies (fuser and swing plate).
Follow up:
The fuser is relatively expensive but very easy to replace. The swing plate is just the opposite: relatively inexpensive but very difficult to replace, at least by conventional methods. A recent article in another publication detailed a procedure for replacing the swing plate assembly that involves disassembling much of the printer, and that will take an hour or two, even for an experienced technician. But in most cases, this full procedure is unnecessary. There is a much easier way, provided certain conditions are met.
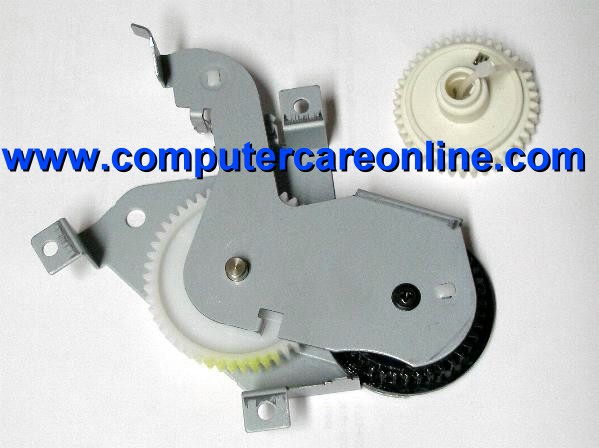
If you look at the swing plate assembly (see figure 1), you will notice that it has two gears. One of them (white and on the left in figure 1) couples to the main drive; the other one (black and on the right in figure 1) couples to the fuser. If both gears are damaged, you will have to replace the whole assembly, and this article won't help you. But in the majority of cases, only the fuser drive gear is damaged, and it is surprisingly easy to replace just this gear.
Figure 1: The Swing Plate Assembly
At present, you cannot buy just the fuser drive gear (but see note at end of article), but you can buy the swing plate assembly (still a relatively inexpensive part), remove the fuser drive gear from it, and install just that gear, thereby saving yourself a great deal of labor.
We would recommend starting by disassembling the new swing plate assembly, to get a feel for how it comes apart, before you disassemble the one installed in the printer. Note that the fuser drive gear is secured by just one screw. Remove that screw from one side, then push the gear shaft out the other side, and now you should be able to remove the plastic spacer disk, and finally the gear. Figure 2 shows the swing plate assembly with these 4 parts removed. Note the orientation of the disk and gear as you remove them.
Sponsor:
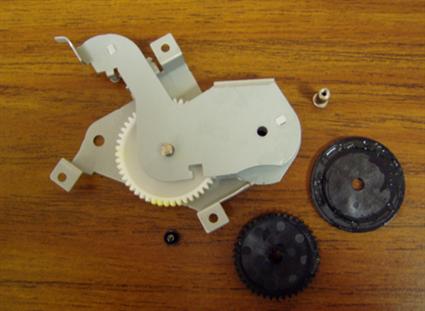
Figure 2: Disassembled Swing Plate Assembly
The next step is to remove that same gear from the swing plate assembly in the printer. You'll still have to remove a few other things to get to it, but not nearly as much as in the full procedure described in the other article. Here's our procedure:
If the printer has the optional duplexer installed, remove it by lifting it slightly and pulling it away from the printer.
Remove the rear output bin by opening it, squeezing the hinge pin in the right rear (on your left if you're behind the printer) out of its mounting hole, and then rotating the bin until the hinge pin is free. Now you can just slide the other hinge pin out of its mounting hole and remove the bin.
Remove the fuser by squeezing the blue release tabs and pulling it straight back out of the printer.
Remove the formatter cover (in the right rear of the printer) by pulling/sliding it to the rear (see figure 3)
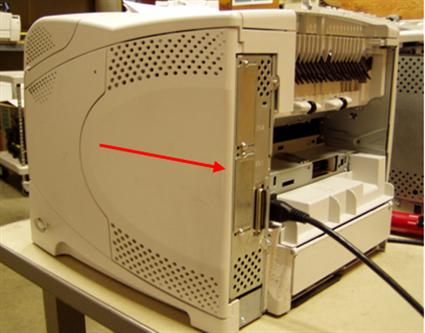
Figure 3: Removing the formatter cover
(slide in direction of arrow)
5. Remove the formatter board by removing 2 screws (see figure 4) and then sliding the whole metal cage out the rear of the printer (there will be some resistance as the self-mating connector unplugs).
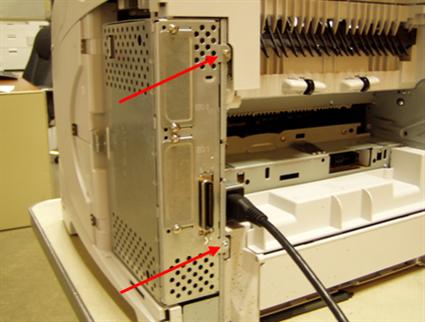
Figure 4: Removing the formatter
(arrows show the 2 screws)
6. Now we can get to the swing plate assembly and the fuser drive gear. The single screw that secures the fuser drive gear is accessible through a conveniently-placed hole in the printer's right side frame (see figure 5). The procedure from here is identical to what we did with the new swing plate assembly earlier, except that you're working in closer quarters: remove the screw, then push the gear shaft out the other side (see figure 6), remove the plastic spacer, and finally remove the gear. Re-assemble in the reverse order (make sure to install the gear before the spacer), using the new gear in place of the damaged one. Make sure to observe correct orientation of the gear and spacer. It will take a bit of patience to manipulate the various pieces so that all the holes line up and you can insert the gear shaft (it may help to lay the printer on its side so that you're not fighting gravity), but this is still much less work than replacing the entire swing plate assembly.
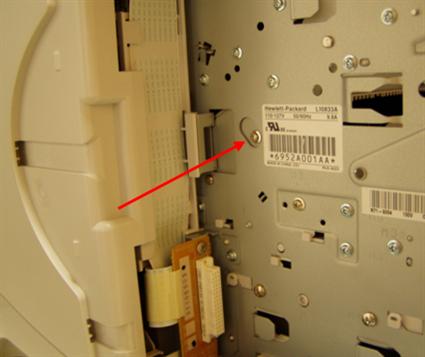
Figure 5: Right Rear Frame of Printer
(red arrow points to the screw that secures the fuser drive gear)
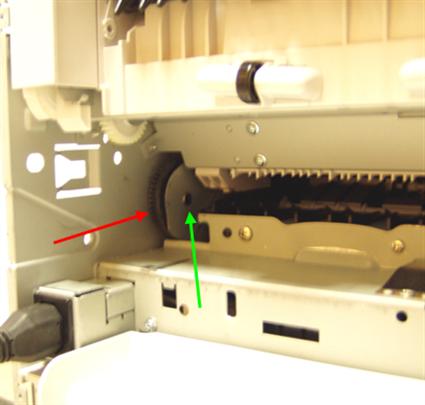
Figure 6: Other side of Right Rear Frame,
showing fuser drive gear (red arrow)
and gear shaft (green arrow)
Remember that if both gears are damaged, you will have to replace the whole swing plate assembly. Fortunately, this is rare. It's easy to visually inspect the fuser drive gear by just removing the fuser, but how can you check the other one? The best way is by performing the procedure described in this article! Once you have removed the fuser drive gear, you can visually inspect the other one (a flashlight may be helpful). If it's in good shape, you can just carry on with the rest of the procedure we have described. If this other gear is damaged, you will have to replace the whole swing plate assembly, but you haven't lost any significant time, because that procedure still requires removal of the fuser, formatter, etc.
However, we are confident that in the vast majority of cases, the procedure we have described will get you going in a fraction of the time that the other procedure would take.
Note: Since this article was written, more options have become available for obtaining the swing plate and fuser parts. You can still get the whole fuser and/or the whole swing plate assembly, but the following parts are also now available:
RM1-0043-GRB Fuser drive gear and spacer (unlubed) from swing plate assembly
RU5-0016-A 40T gear for 4200 & 4300 fusers
RC1-3324-A 40T gear for 4250/4350 fuser
5851-2766 OEM kit, includes swing plate assembly and 4250/4350 fuser gear
(this gear also works on 4200 and 4300 fusers)
Article by: Dennis Kosterman
Like Computer Care on FaceBook
Follow us on Twitter
computer Care on Pinterest
computer Care on instagram
Visit the Computer Care Catalog Online for all your part needs.
Bookmark this article at