Due to questions called into our shop over the years of the exact location and orientation of the Encoder Strip on the HP DesignJet 500 / 510 / 800 plotter models; we thought it was time to post some tips and photos to help you with the correct placement and orientation of the Encoder Strip during the install.
Follow the replacement instructions on page 8-76 of the Remove and Replace chapter of the Service Manual.
Here is what they don't seem to tell you.
Follow up:
Let us start with which end goes where and which side is up.
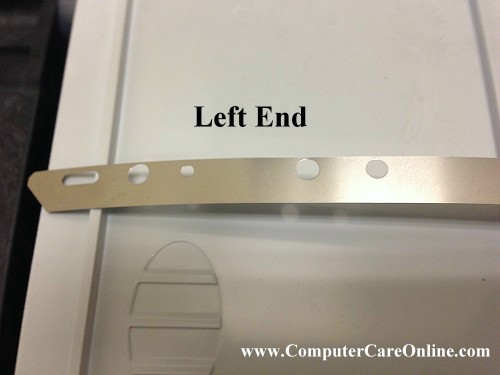
This is the LEFT END of the Encoder Strip, note the 5 holes.
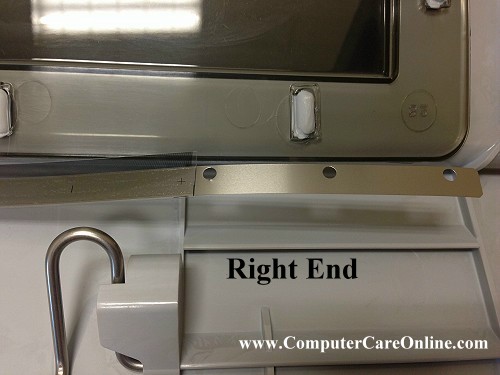
This is the RIGHT END of the Encoder Stip, note the 3 holes. Also note that the Clear Strip is on top and the + - and | are showing on the front of the Metal Strip.
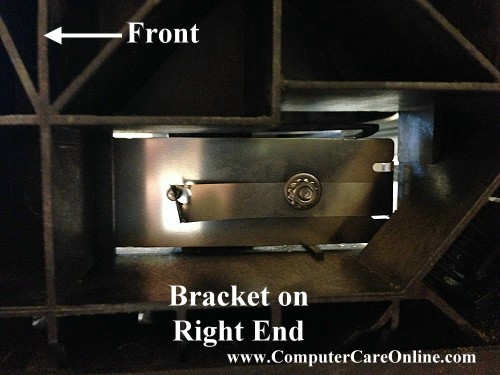
This is the RIGHT END Bracket. Note that the front of the bracket goes in first and then push the back of the bracket into the plotter to seat it into place. Best to attach the Encoder Strip to this end first. as pictured.
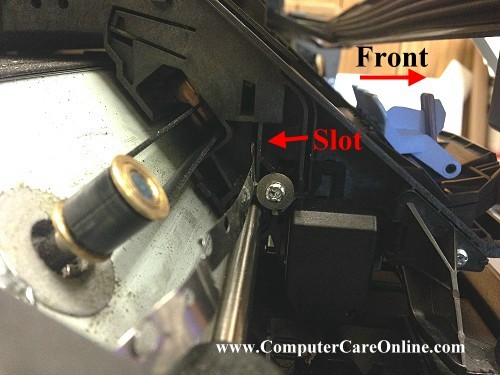
The Encoder Stip must pass through the slots on the back of the carriage Assembly. Note the arrow to "SLOT", it is directly in front of the belt, above the sliver slider rod and behind the screw that holds the Carriage Bushing in place (there is a slot on either side of the carriage, you must gently pass the stip through from one side to the other).
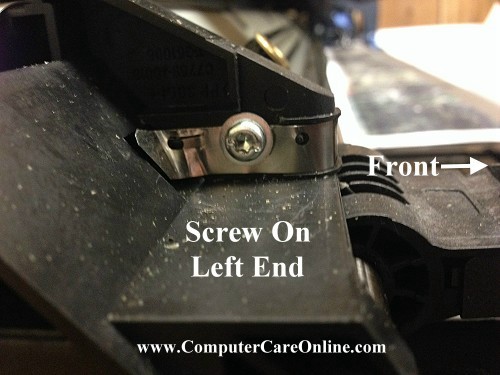
This is the LEFT END attachment. Have a helper go to the RIGHT END and gently push in on the back of the metal bracket (pictured earlier) to provide enough slack on the Strip to allow attachement with the screw. (the strip will "hook" on a small plastic nub in the hole just to the front of the plotter from the screw hole).
At this point it is also worth mentioning, whenever possible, only take one end of the Encoder Strip loose at a time, if you can. It saves time and avoids mistakes.
Using the pictures and description above should aid you in reinstalling your new Encoder Strip in your DesignJet Plotter. We have noted that the manual is not very clear about the placement and orientation of the Encoder Strip so I do hope this helps to clear up any doubts or questions.
Happy Plotting.
Like Computer Care on FaceBook
Follow us on Twitter
computer Care on Pinterest
computer Care on instagram
Visit the Computer Care Catalog Online for all your part needs.
Bookmark this article at